When my wife dropped her old cell phone from the balcony to the concrete-paved yard, the phone took a few bounces and distributed itself then in several pieces around it. That was it, I thought. But as we collected the pieces, snapped them together and turned the power on, the phone worked perfectly again despite the few scratches it had gained. Excellent job on mechanical design, I had to conclude (the phone was, by the way, an ancient Nokia).

Impact resistance (or impact strength) describes a material’s or a product’s ability to absorb shock or impact energy without breaking.

Something that feels strong and stiff might be surprisingly easy to break with a bump to the right spot. Resistance against impacts is one of the key requirements in plastic product design. It is clear that a helmet or a ski boot should have high impact resistance, but almost every plastic product is subjected to impacts at some point of its service life and the consequences are often irreversible. All products should preferably be impact resistant to a degree for more reasons than one. They may fall down from store shelf before they ever meet the customer, to begin with.

Impact resistance is in fact one of the key strengths of plastics. It is why they are used in e.g. helmets, riot shields and sports gear. They replace glass in many applications, and in some cases they can be more durable than metals; if you kick a metal bucket, for example, you easily make a dent in it. A well designed plastic bucket would take the impact with no problem.

Impact resistance is not, however, an inherent material property to all plastics grades. Some grades are rather poor in withstanding impact, as we all may have noticed with cheap plastic toys or other similar products.

Selecting the right material is in main role when designing impact resistant products but the mechanical design/geometry makes a big difference as well. Tips on material selection and mechanics can read below.

Impact Resistance – tips for plastic material selection

Either I am dumb or the Izod and Charpy values expressed on the datasheets are confusing, but I have never been able to utilize them in practise. Apart from the units being sometimes in J/m and sometimes in J/m2, the tests are conducted in circumstances that are not particularly realistic in terms of load case, product geometry, material orientation and temperature. I understand that the general purpose of the data is to help designers to compare different plastic grades, but in case of impact resistance I haven’t found them useful. If you have been able to make use of them in practise, please tell us how in the comments at the bottom of this page. I have instead opted to divide the plastic materials into three groups:

1 Brittle materials that should be avoided when risk of impacts is high

These are for instance amorphous grades, such as PS, PSU, SAN and PMMA (although it is used on ice-skating rink panels). They all share a lack of overall toughness. Lack of toughness is also a factor that reduces the impact resistance of some reinforced plastics. PPS+40GF, for instance, has very high modulus and therefore low toughness. If you knock the edge of the corresponding Plasticprop sample, you can hear a glassy sound. This indicates low impact strength. The same applies for polypropylene. PP-H (homopolymer) is stronger and stiffer than PP-C (copolymer), but its toughness and therefore impact resistance is smaller.

2 Impact resistant materials

Polycarbonate PC is the mother of all impact resistant plastics. However, its superior properties are not fully explained by high toughness. The molecule structure of PC is very firm and it requires a lot of energy to tear the chains apart. The high impact resistance of polycarbonate is utilized in many alloys like PC/ABS, PC/PBT and PC/PA. Here is an amusing video that illustrates PC impact resistance over PMMA:

ABS is also known for its impact resistance which remains good also in low temperatures. This is based on the small butadiene particles that absorb the impact energy. The same principle applies also for HI-PS and impact modified PP (PP+TPE-O). PPO was earlier quite common choice for TV housing. It is often used as an example of good impact resistance, but my personal experience of the material is limited.

3 The materials in between the two

Practically all engineering plastics like PA, PBT and POM withstand impact relatively well. This again depends on toughness. If you can cause a permanent deformation in a material sample by bending it, this indicates that the material has a degree of plastic behaviour. If so, it is probably reasonably impact resistant.


Plastic product Impact resistance – what can you do with the geometry

  1. Skilled boxers have good impact resistance. They can absorb the energy of impacts with their whole body, not just one part of it, nose for instance. The same principle applies not only to material toughness, but to mechanics as well:
  2. Try to distribute the energy of impacts to the whole construction. Do not maximise the stiffness of the product without a good reason. Think of the component as a spring.
  3. Impact resistant materials are able to absorb energy in their internal structure. That requires bulkiness to some degree from the construction. A helmet with 0,5 mm wall thickness is not very impact resistant. Robustness is good. Don’t make the shock-absorbing elements too thin or lacy.
  4. Sharp corners and notches operate as stress raisers. This goes with static loads as well, but in the case of impacts, they are merciless.
  5. A rib that is meant to strengthen the product might easily reverse the intended purpose by crack propagation. Ribs should preferably be under compression rather than tension.
  6. If possible, try to avoid weld lines in the areas that are exposed to shocks. The same goes for gating, too.

Other aspects to take into consideration

Reinforcement

Reinforcements are two-edged swords when it comes to impact resistance. Increased strength is a benefit but high stiffness reduces toughness. Being able to decode the Charpy-V or Izod values might help, but I suggest studying each case with a hammer.

The effect of temperature

Service temperature is an important factor in impact resistance. In elevated temperatures it tends to be higher (to a limit), but when it is lowered, plastic products tend to turn stiffer. As the modulus of the material is increased, some toughness is lost. Amorphous plastics do this gradually but semi-crystalline materials might turn from ductile to brittle very suddenly as the temperature goes below their Tg. A water bucket made of PP (Tg app -10°C), for example, might easily break on a cold winter day while a HD-PE bucket (Tg app. -90°C) is still ductile. Based on this, one might expect PA6 (Tg app. 50°C), for instance, to be brittle in room temperature, but it is not. It is not that simple, in other words; each plastic material has its own characteristics.

Finding a stress-strain-temperature curve for each material candidate is therefore helpful and Campusplastics database is worth researching: Type for an example “stress-strain PC” into the search-area to find diagrams available for different PC grades.

Impact fatigue

Resistance against fatigue applies to impacts as well. Some plastic products might withstand single shocks well, but fail with repeated impact, even with smaller energy level. My practical experience is that amorphous materials are more sensitive to impact fatigue than semi-crystalline, as is the case with normal fatigue. Long term testing of impacts must not be overlooked.

In practice, all plastic materials come with a datasheet that states their mechanical properties and service temperature area. Usually, the values are measured and given at room temperature only. It is important to bear in mind that elevated temperature has a significant effect on the strength and modulus of plastic materials.

Amorphous plastics gradually soften as temperature increases. For example, an acrylic PMMA product has totally different characteristics when used at +70°C than at room temperature – even if both temperatures are within the given service temperature area according to the material datasheet.

Semi-crystalline plastics turn gradually softer as well, but they may also change their behaviour more rapidly when they cross their material-specific glass transition temperature, Tg. They change from glassy state (below Tg) to rubbery state (above Tg). In the glassy state semi-crystalline plastics have higher strength and modulus, but they are more brittle. PBT, for instance, has Tg of app. 55°C. If you set a Plasticprop sample made of PBT into an oven, you can probably feel the difference between 45°C and 60°C.

Short-term use: how to avoid problems with design

  • Establish the maximum temperature your product is going to be used in.
  • Take this into account when choosing the material. The maximum service temperature should be clearly within the given service temperature area.
  • Explore how the material strength and modulus are changed by the elevated temperature. Stress-strain curves are a good tool for this. It is also informative to set some reference samples into an oven and study how their properties change in different temperatures.
  • Make sure your design is still strong and stiff enough when the mechanical material properties have decreased below the usual service temperature. Take the Tg into account if it is within the service temperature area.
  • Do not exaggerate. The combination of maximum load in maximum temperature is often very unlikely. If your design is based on this, it might be too heavy and too expensive for the great majority of the users.

How does long-term use differ from short-term use when it comes to elevated temperature?

It is important to understand that in plastic product design short-term and long-term service temperatures require different approaches.

In long-term use, we have to keep stress-cracking, fatigue and creeping in mind. The most efficient way to avoid their unwanted effects is to make the product significantly stronger than short-term loading would require.

For example, if a lever must carry a continuous load of 10 units, you should design it in a way that it can easily carry a load of 50 or even 100 units. But in the case of continuous elevated temperature, this ratio must be based on the material properties at the expected temperature, NOT at room temperature.

It is also worth knowing that long-time exposure to high temperatures might degrade a plastic product. This phenomenon is called thermal degradation.

“The Plasticprop collection of plastic samples was set off by my daily need to assess and compare different plastics in practise. The Plasticprop Essentials contains 20 plastic samples with different characteristics. The set covers a wide range of materials that are commonly used in consumer goods, packaging, kitchen utensils, sporting equipment, vehicles and electronics.”

Markus Paloheimo

Plasticprop Essentials sample kit gives you tangible information about the following plastic grades:

Essentials 1:

  1. ABS
  2. PC
  3. PMMA
  4. PS
  5. PP, Random Copolymer
  6. HD-PE
  7. POM
  8. PA6
  9. PA66+30% GF
  10. PP+30& GF

Essentials 2:

  1. PC/ABS
  2. ASA
  3. HIPS
  4. SAN
  5. LD-PE
  6. TPE-S
  7. PP, Homopolymer
  8. PBT
  9. pPA+50% GF
  10. PBT+30% GF

I have often found myself in a situation where a datasheet states material strength and modulus as flexural or tensile; sometimes both but at other times only one of them.

I find this confusing and decided to research the subject. Here are the results:

The difference between the two testing methods can easily be understood by watching these two short videos. If all is clear to you, just skip the clips and move on.

Video: Tensile


Video: Flexural

This is pretty understandable. But how does it relate to actual values? How close are they to each other? I made a little comparison. In Prospector database you can compare different material properties as a diagram. The options that I chose were injection-mouldable grades (from Albis Plastic Gmbh’s offering), commodity/high-performance, amorphous/semi-crystalline and reinforced/unreinforced. (Albis, incidentally, is a random choice).


How is it with Modulus?

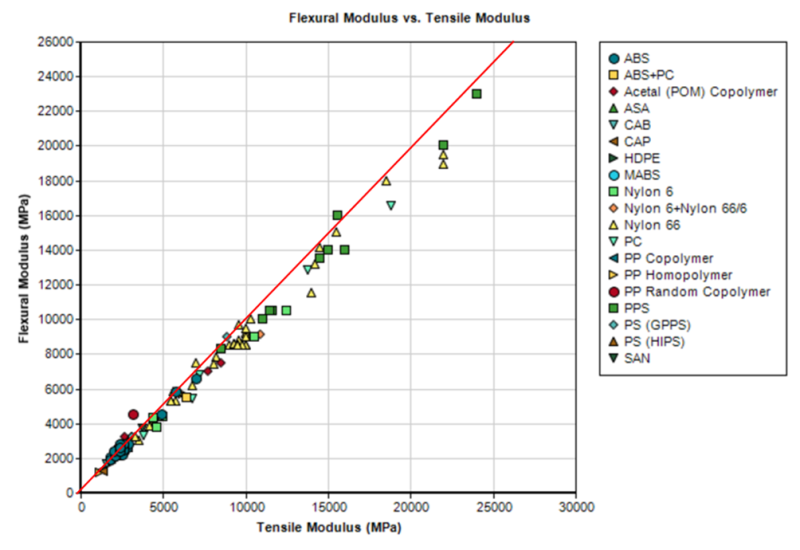
This is how it looks when flexural and tensile moduli are set on the x- and y-axes:

I’ve added a red line to illustrate where the 1:1 ratio would go. As we can see, the values follow the red line relatively closely, confirming that for most polymers, flexural modulus and tensile modulus do not significantly differ from each other. This is in line with my experiences. I would claim that it is possible to compare these two as apples to apples and not go too much astray. It is much more likely that a designer falls into the pothole of considering material properties in room temperature only, as they are usually listed in the datasheets, without taking into account changes due to elevated temperature or moisture absorption.


How about Strength then?

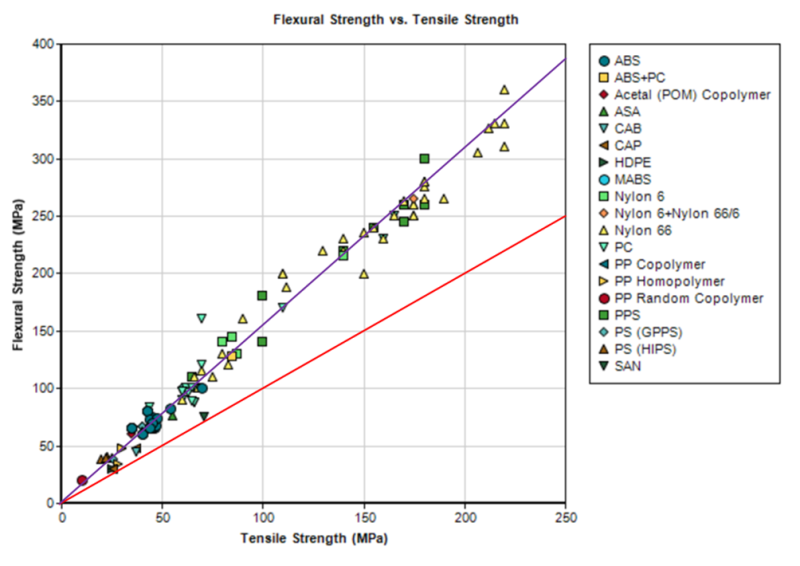
Let’s do a corresponding comparison:

There is more deviation now and the values no longer follow the red 1:1 line. I have drawn a blue line to roughly illustrate the average tendency. It appears that the flexural strength values are roughly 1.5 times higher than the tensile strength values. There are some exceptions and it would be unwise to simplify the case by making it a rule of thumb, but the tendency is probably worth making a note of.

So, which value to use?

In case of clear bending or pulling loads the corresponding values are without a doubt usable. In practice, however, the load is usually some sort of a combination of them, and compression or torsion may be added to the mix. Apart from the load, the geometry of your design is likely to be quite far from a test-lab arrangement. The standardized specimens do not take into account weld-lines or fiber-orientation, either, both of which exist in real products. Plastic product designers should therefore never rely on datasheet values too closely.

The one most important but often overlooked thing, however, is that the design should meet its long-term use requirements. If elevated service temperature and/or continuous/cyclic loads are expected the strength of your design should be many times higher than what the static strength calculations suggest. For this reason, the decimals do not matter. In calculating the strength in demanding applications I would increase the safety factor by using the lower value, usually the tensile value.

UV rays weaken the bonds in and between polymer chains. Free broken “tails” react with oxygen. This affects plastic in two ways:

Mechanically:

  • Ductile material turns brittle. Loss of impact resistance.
  • Increased sensitivity to stress cracking.
  • Cracks that function as stress concentrations.
  • Softeners rise to the surface of the product.

Visually:

  • Product colours fade or change tone. White turns yellow. After a few years of use, a red flowerpot might have become baby pink.
  • Chalking
  • Flow lines and reinforcement orientation become visible
  • “Desert effect”: visible net of cracks on the surface of the product

These issues, especially when used outdoors, apply to all plastics (with certain exceptions regarding fluoroplastics).

How to design against problems

The negative impacts of UV light are difficult to avoid completely, but they can be mitigated or delayed so as to be insignificant.

  1. Consider mechanical properties and colour stability as two different cases. Consult your material supplier about mechanical strength and your color supplier about colour stability.
  2. Opt for base materials like PMMA, PA6, and polyesters, which endure UV better than average. The Plasticprop Material Selection Guide will help you with this.
  3. In addition, always opt for grades (material and colorant) that are specially modified with UV stabilizers and blockers. “General purpose grades” of any material are more likely to lead to problems.
  4. Dark colours prevent the UV rays from penetrating deeper into the polymer structure. They also make yellowing less noticeable.
  5. Consider using carbon black in especially harsh conditions.
  6. Bear in mind that UV light is also present indoors.
  7. Painting or lacquering the component is an option as well. Silicate lacquer is commonly used with PC.
  8. Try to find reference cases of materials that have survived well under corresponding conditions.
  9. Test. UV chambers are widely available. You can adjust exposure according to your needs. Test mechanically before and after treatment.